Hexo博客配置
博客使用 cactus主题.
首次使用hexo
- 安装node.js
windows下.
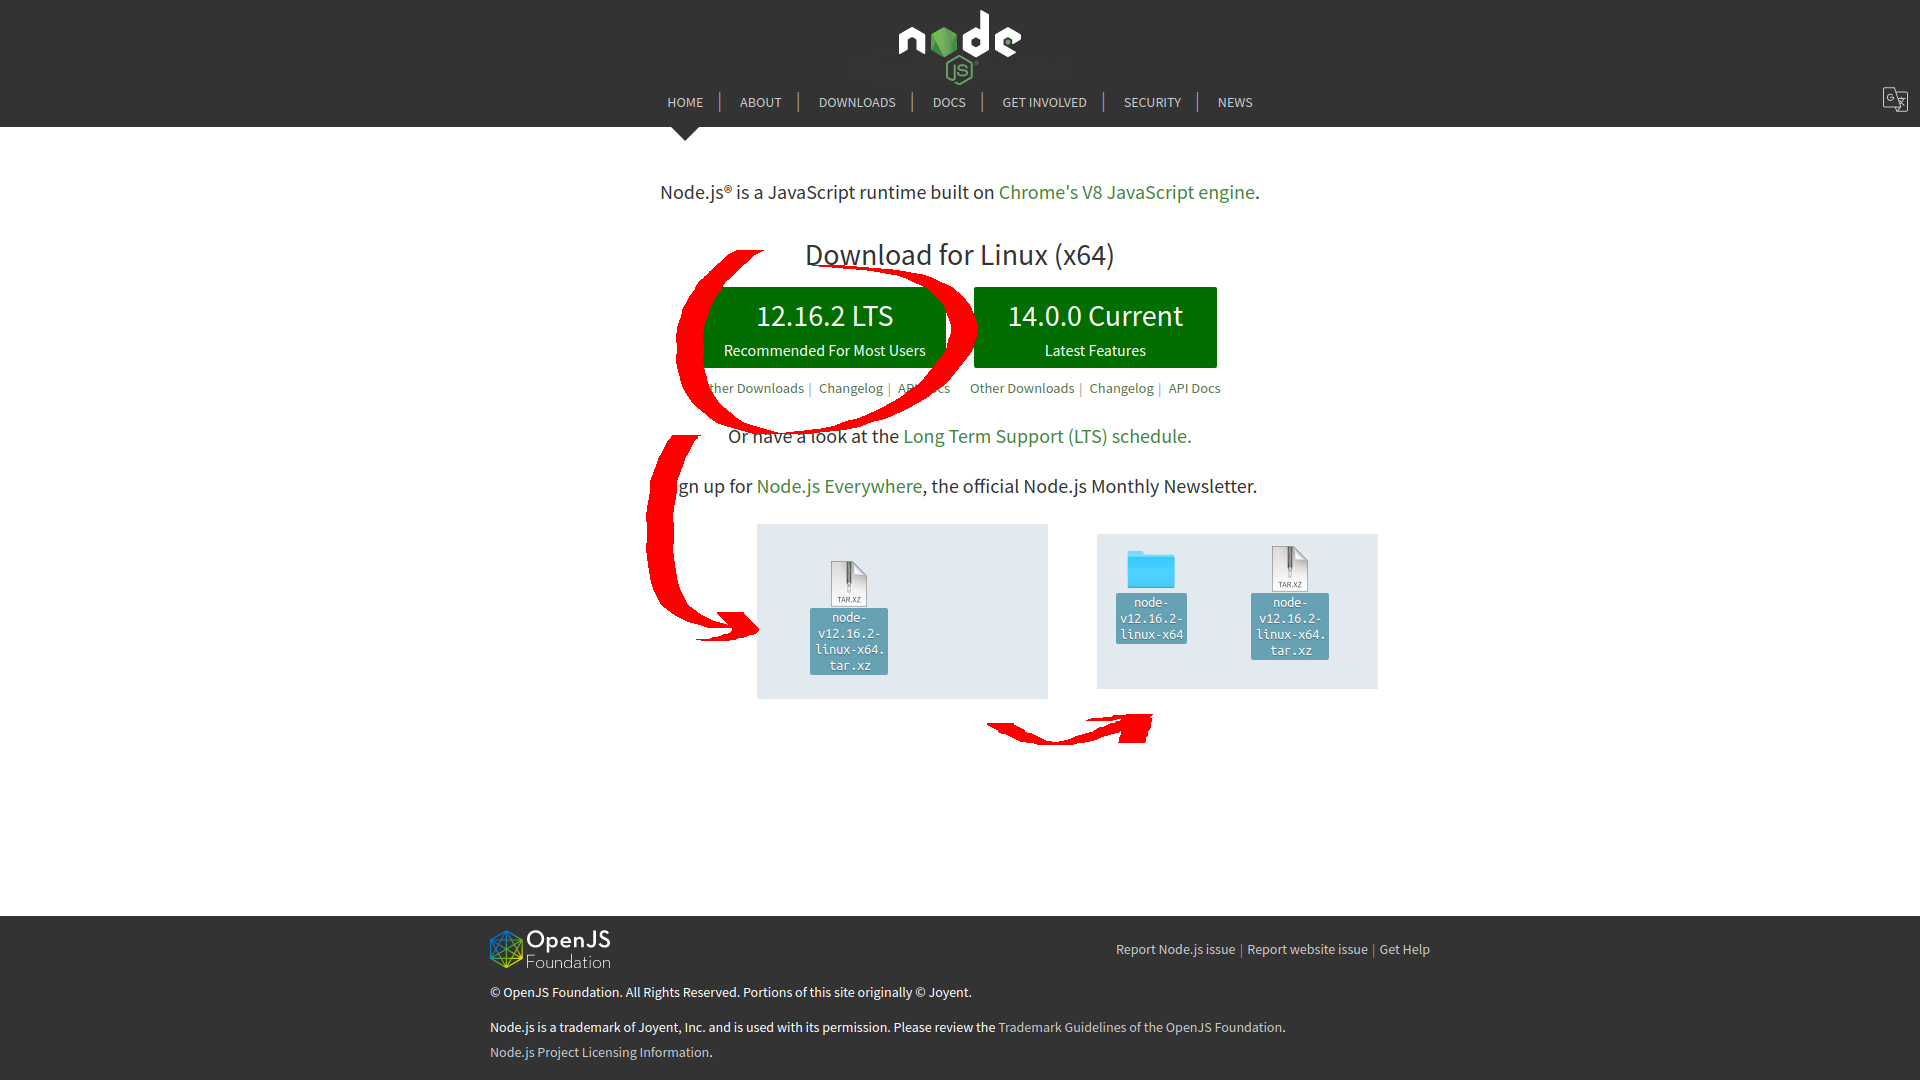
node.js链接 https://nodejs.org/en/
node.js安装会给系统安装一个npm的包管理器,这是hexo搭建博客所需要的;
linux下.
下载源码包,然后解压到任意文件夹
sudo cp node-v12.16.2-linux-x64 /opt/ |
执行上面的代码进行软连接.
打开终端获取管理员权限.
windows使用管理员身份运行命令提示符窗口.
liunx or mac则使用sudo su获得管理员权限.
查看node版本.
node -v |
查看npm版本
npm -v |
返回版本号则安装成功.
2. 安装git.
安装完成后可以在系统上找到 Git Bash Here.
3. 安装hexo.
npm install -g hexo |
返回版本号则安装成功.
上面的安装步骤可能会需要重启电脑后才生效.
Hexo安装
- 使用npm安装cnpm来提高构建博客框架时下载文件的速度的
npm install -g cnpm --registry=https://registry.npm.taobao.org
linux
在linux执行完上一步骤后可能使用cnpm会返回是因为这样安装他的软链接不会指向/usr/bin/目录,你需要返回查看cnpm安装时返回的代码如下Command 'cnpm' not found, did you mean:
command 'npm' from deb npm (6.14.4+ds-1ubuntu2)
command 'cypm' from deb pakcs (2.2.0-1)
command 'cpm' from deb cpm (0.32-1.2build2)
command 'cxpm' from deb xpmutils (1:3.5.12-1)
Try: sudo apt install <deb name>然后手动创建软连接,之后再执行cnpm就可以使用了/opt/node-v12.16.2-linux-x64/bin/cnpm -> /opt/node-v12.16.2-linux-x64/lib/node_modules/cnpm/bin/cnpm
+ cnpm@6.1.1
added 685 packages from 953 contributors in 14.043ssudo ln -s /opt/node-v12.16.2-linux-x64/bin/cnpm /usr/bin/cnpm
- 使用cnpm安装hexo按照上面的方法手动创建软连接
cnpm install -g hexo
sudo ln -s /opt/node-v12.16.2-linux-x64/bin/hexo /usr/bin/hexo
初始化Hexo并配置仓库地址
- pwd 返回当前终端所在系统位置
- mkdir ‘文件夹名’ 创建一个博客文件目录,后续的配置都在这个目录内进行
- hexo init 初始化博客框架
初始化hexo.初始化报错,可能由于网络延迟导致,配置国内源taobao.mkdir blog
cd blog
hexo init初始化成功后查看文件列表如下.npm install -g cnpm --registry=https://registry.npm.taobao.org
在ls -l
#total 261
#-rw-r--r-- 1 Administrator 197121 2465 2月 10 01:49 _config.yml
#-rw-r--r-- 1 Administrator 197121 71577 2月 10 01:49 db.json
#drwxr-xr-x 1 Administrator 197121 0 2月 10 01:13 node_modules/
#-rw-r--r-- 1 Administrator 197121 581 2月 10 01:35 package.json
#-rw-r--r-- 1 Administrator 197121 133002 2月 10 01:13 package-lock.json
#drwxr-xr-x 1 Administrator 197121 0 2月 10 01:49 public/
#drwxr-xr-x 1 Administrator 197121 0 2月 10 01:02 scaffolds/
#drwxr-xr-x 1 Administrator 197121 0 2月 10 01:02 source/
#drwxr-xr-x 1 Administrator 197121 0 2月 10 01:46 themes/
## 可以列出当前目录下的hexo创建的所有文件windows使用dir来查看_config.yml中添加以下代码,配置github远程仓库地址.deploy:
- type: 'git'
repo: 'https://github.com/pandaefx/pandaefx.github.io.git' # 部署仓库地址
branch: 'master' # 分支名master main
hexo start |
hexo n "博客文章名" |
hexo clean |
hexo generate |
Hexo博客本地预览
生成本地预览网页
hexo clean REM 清除页面历史 |
hexo generate REM 生成本地预览文件 |
hexo server REM 启动本地预览服务 默认为 http://localhost:4000/ |
预览完毕按Ctrl+C退出预览,再执行一次hexo clean,确保文件目录保持干净.
hexo clean |
安装hexo-deployer-git
在博客根目录下使用以下命令安装git
cnpm install --save hexo-deployer-git |
git 用户配置
# git config --global user.name "用户名" |
配置ssh密钥
- 检查ssh密钥是否存在
cd 到系统根目录,使用ls -l 列出所有文件,如果有.ssh文件夹存在,则打开.pud结尾的文件将密钥复制到远端站点的用户设置内! - 生成SSH密钥
ssh-keygen -t rsa -C "your_email@example.com"
## 使用以上代码会生成一个.ssh的文件夹在系统根目录内,.ssh文件夹内就有id_rsa和id_rsa.pub两个文件,分别表示生成的私钥和公钥
## 公钥一定要妥善保管,切勿泄露他人,以免心怀不轨的人偷走你的'小姐姐'or'小哥哥'
部署到远端仓库
$ hexo clean |
主题替换
Hexo主题官网
git clone https://github.com/JoeyBling/hexo-theme-yilia-plus.git /themes/yilia |
博客源文件更新与同步
源文件仓库地址https://github.com/pandaefx/hexo-site.git
首次或本地没有源文件仓库时,先获取github远程源文件仓库.
git clone https://github.com/pandaefx/hexo-site.git |
首次使用git时要配置用户名和用户邮箱
git config --global user.name "username" REM 配置用户名 |
修改或添加文章
….
更新源文件到仓库
如果有执行过hexo部署的先清除本地缓存
hexo clean |
提交修改并推送至
git status REM 查看仓库状态 |
hexo常用插件
hexo-generator-search 本地搜索
npm install hexo-generator-search --save |
hexo-generator-feed rss订阅
npm install hexo-generator-feed --save |
hexo-deployer-git 博客推送/发布
npm install hexo-deployer-git --save |
首页显示工程列表
在根目录下source文件夹内创建_data/projects.json(不是theme/castus/source/)
[ |
标题样式修改
将文章##号改为H2;在/theme/cactus/source/css/_partial/article.styl
.content |
将文章目录标题##号改为H2;在/themes/cactus/source/css/_partial/post/actions_desktop.styl
&:before |
博文相关
在博文中添加图标
在文章任意位置添加以下代码
<head> |
就可以从 https://fontawesome.com/icons/
<i class="fa-solid fa-font-awesome"></i> |
修改博客签名字体
- 下载字体文件(Time-Machino.ttf)存放到
/theme/cactus/source/lib/下. - 在
/theme/cactus/source/css/下新建名字为_myfonts.styl的文件内容如下.@font-face
font-style: normal
font-family "Machino";
src: local("Time Machino"), url("../lib/Time-Machino.ttf") format("truetype") - 打开在
/theme/cactus/source/css/下的style.styl,在开头加入@import "_myfonts"引入字体. - 打开在
/theme/cactus/source/css/下的style.styl,在末尾对要修改的标签进行操作,如下.h1{
font-family: Machino;
}
添加友链页
新建friend的页面文件.
hexo new page friend |
打开根目录/source/friend/index.md
--- |
之后只要按照格式插入<body></body>中并修改对应参数即可.
<div id="friend-box"> |
在根目录/source/friend/下新建friend.css
:root{ |
根目录/source/friend/index.md中的link的css引用一定要仔细检查,对应上friend.css文件的位置.
配置博客到云服务器
先看[[202405182153|Nginx]]的配置.
BlackFile哔哩哔哩Up主
centeros8.0
华为云
安装shell并联机
- 下载xshell,并安装xshell.
- 购买云服务器,会获得主机113.**.***.158和用户名root并且一定要记得先重置以下主机的密码.
- 打开xshell,文件->新建->输入主机113.**.***.158,设置名称.

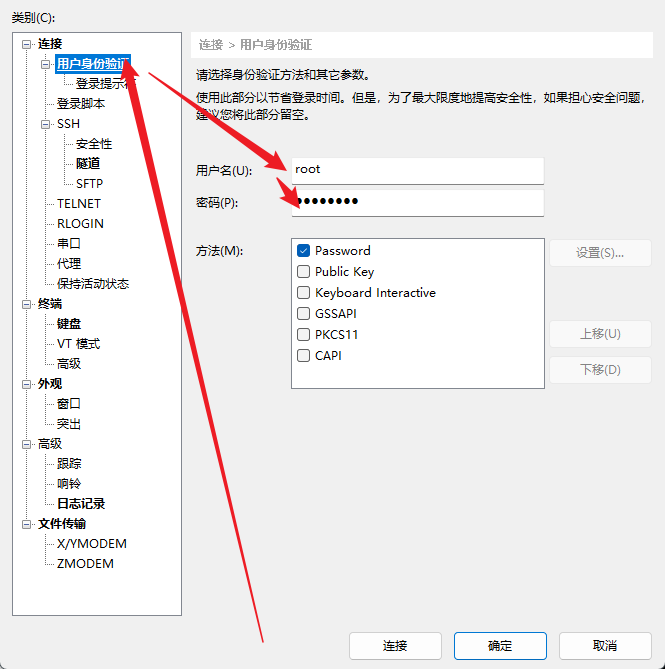
- 点击用户身份验证->输入用户名->密码(重置的主机密码)->确定->在左边栏右键主机->属性->链接(成功进入).

安装git
系统为centos7.
sudo yum install -y git |
源码安装↓.
sudo yum install -y wget |
可以先去git官网看看最新的版本号然后替换版本号↓.
wget https://mirrors.edge.kernel.org/pub/software/scm/git/git-2.9.0.tar.gz |
下载好后就是解压安装↓
tar -zxvf git-2.9.0.tar.gz REM 解压git |
配置git在主机的PATH环境变量.
which git REM 查看git的安装位置 |
创建主机用户和密码并配置SSH密码
用户密码.
zxcv
用户名.
abc
创建用户并设置用户密码.
adduser cat REM cat为用户名 |
为用户分配权限.
usermod cat -G wheel |
本地创建ssh密钥(在本地的电脑上打开终端执行,不是xshell的服务器上⚠️)
ssh-keygen -t rsa |
一直按回车就完事了,最后会提示/c/Users/panda/.ssh/id_rsa.pub密钥路径.
打开C:\Users\panda\.ssh文件夹,将id_rsa.pub内容复制备用.
回到xshell远程主机终端上.
su - cat |
这是终端内的用户从root@机器名->cat@机器名说明用户切换成功.
vim .ssh/authorized_keys REM 新建并编辑authorized_keys文件 |
如果提示没有vim则可以换nano等其他文本编辑器或者安装vim↓.
sudo yum install -y vim |
最后将id_rsa.pub的内容粘贴到authorized_keys上(vim保存退出’:wq’).
cat .ssh/authorized_keys |
打印出密钥则粘贴成功了.
配置用户密钥.ssh权限
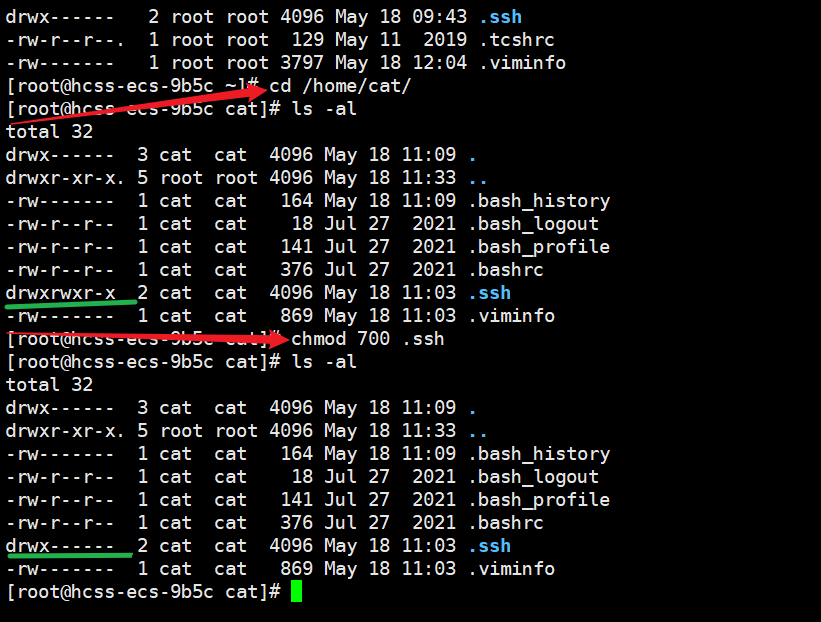
移动到用户cat目录下修改.ssh的文件权限权重如下↓.
cd /home/cat/ |

git仓库配置
exit REM 提出用户进入root管理员,确保在root用户下再执行下面的操作↓. |
mkdir /home/git/ REM 创建git目录 |
进入git目录,初始化一个git仓库,并设置仓库的权限.
cd /home/git/ |
新建钩子文件post-receive.
vim /home/git/blog.git/hooks/post-receive |
将以下↓两句粘贴到/home/git/blog.git/hooks/post-receive文件中,:wq保存并退出.
#!/bin/bash |
使用cat /home/git/blog.git/hooks/post-receive打印看看没有吗保存成功.
chmod +x /home/git/blog.git/hooks/post-receive REM 修该文件夹权限 |
配置nginx
创建blog目录用户nginx转发.
mkdir /home/blog/ |
安装nginx.
yum install -y nginx |
启动nginx.
systemctl start nginx.service |
查看Nginx服务状态.
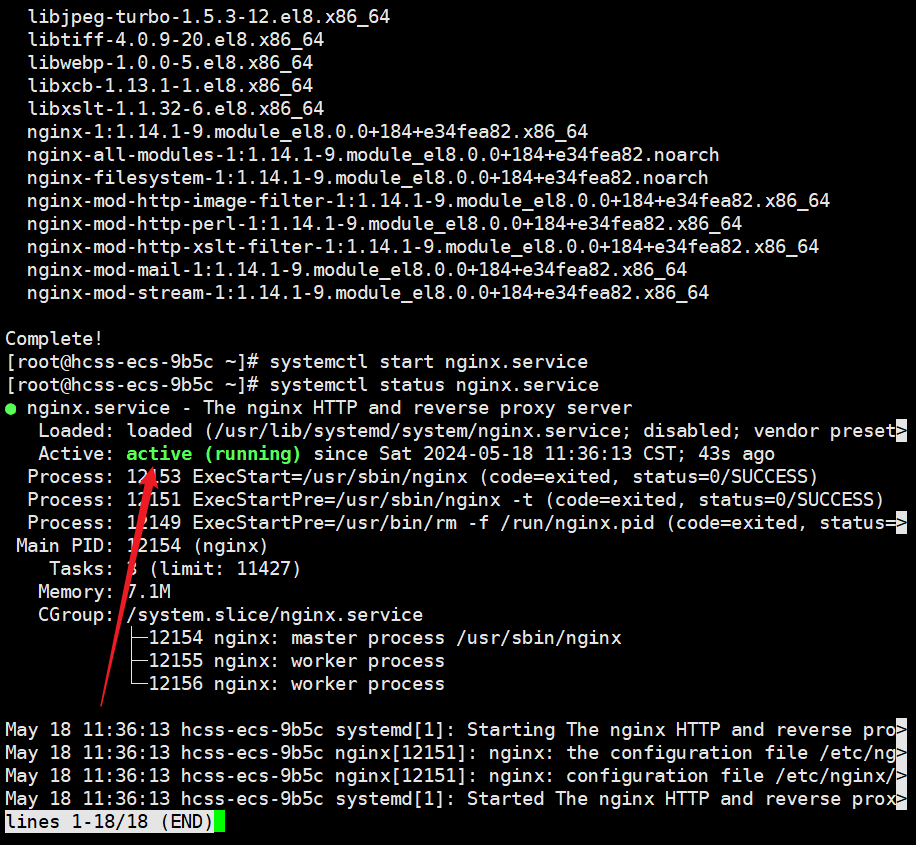
systemctl status nginx.service |
如下图所示即安装成功👌.
配置nginx转发
查看nginx的默认配置文件的安装位置.
nginx -t |
configuration file /etc/nginx/nginx.conf test is successful
使用vim或其他文本编辑器打开/etc/nginx/nginx.conf
vim /etc/nginx/nginx.conf |
修改以下有文字说明的内容↓.
server { |
分别是root后面和server_name后面,改完:wq保存退出.
重启Nginx服务.
systemctl restart nginx.service |
配置本地blog文件并发布到云服务器
修改_config.yaml
deploy: |